Zimbra Collaboration Open Source E-Mail Server birçok ihtiyacınızı karşılayan ücretsiz, kullanımı ve kurulumu kolay, teknolojisi yüksek mutlaka denenmesi gereken mail sunuculardan biridir.
Zimbra’nın ücretli olarak da sunmuş olduğu bazı ürünleri mevcut ancak Zimbra Collaboration Open Source versiyonu bir çok ihtiyacınızı fazlasıyla karşılayacaktır.
Zimbra Collaboration Open Source versiyonunun bazı özellikleri:
Administrative Benefits
- Lower-Overhead Management
- Native Hierarchical Storage Management or Information Lifecycle Management (HSM / ILP)
- Multi-domain support and administration on a single node
- Online single mailbox restore to point-in-time
- Online mailbox moves (and backups)
- Rich, zero footprint, AJAX-based administrator interface (cross browser/OS)
- Dashboards for real-time system activity
- Comprehensive command-line tools
- SOAP APIs for every administrative action
- Server and Storage Consolidation
- Substantial reduction in managed storage – One copy of email &
attachments per server (rather than one per user or one per storage
group) - Substantial increase in the number of users per CPU – Multi-level caching and optimization of underlying system.
- Substantial reduction in managed storage – One copy of email &
- Compatibility with Existing Infrastructure
- Web services – Full API for easy Bi-directional integration with enterprise applications like CRM, ERP, etc…
- Client – Outlook, Mobile, IMAP, POP, iCalendar, RSS, etc.
- Directory – Active Directory/LDAP integration, provisioning support
- Messaging Server – Co-existence and migration tools (including Microsoft Exchange)
- Security
- Web security model – Single sign-on, TLS/SSL, no VPN required
- Secured attachment opening and HTML rendering
- SpamAssassin and ClamAV included
- Compatibility with existing anti-spam/anti-virus (via Postfix & amavisd-new)
- Open solution
- Open source
- Open formats – One MIME message per file means Zimbra storage is not opaque to sys. admin. or operating system utilities
End-User Benefits
- Freedom of Client Choice
- Browser – Zimbra Ajax client
- PC Client – Outlook (Online, Offline, Cached Mode), Apple Mail and iCal, Eudora, Evolution, Thunderbird/Sunbird, RSS, etc.
- Mobile – Wireless devices “over the air” synchronization:
Blackberry (via partner solutions), Palm, Nokia, Motorola, Good,
PocketPC, etc.
- Self-Organizing Mailboxes
- Powerful, fast search (including messages and attachments)
- Saved searches across folders
- Conversation views across folders
- Filters
- Comprehensive Calendaring
- Group scheduling with free/busy management and controls
- Multiple calendars per user
- Calendar delegation and sharing
- Multi-calendar views
- Subscribe to external calendars in .ics format
- Extensible model for linking message content to external web services and applications (expressable via hover-over and/or click)
- Intranet – ERP, CRM, Support, Finance, HR, VoIP phone, etc.
- Internet – Google/Yahoo Maps, Skype, Travel, Package Tracking, etc.
- Efficient context switching
- Quickly view/create calendar appointments while in mail
- Quickly create/edit contacts while in mail
- Quickly view sender’s website while in mail
- Any Place, Any Machine
- Rich, zero footprint, AJAX-based end-user interface (cross browser/OS)
- Security sans VPN
- Secure, read-only access to attachments without special-purpose client software
- Modern collaboration styles/formats
- RSS/ATOM feeds
- Tags
Zimbra Collaboration Open Source versiyonunun temel gereksinimleri:
Servers Evaluation and Testing
• Intel/AMD 64-bit CPU 1.5 GHz
• RAM requirements:
• For single server installations, a minimum of 8GB of RAM is required.
• For multi-server installations, contact Zimbra sales for recommendations.
• 5 GB free disk space for software and logs
• Temp file space for installs and upgrades*
• Additional disk space for mail storage
Production environments
• Intel/AMD 2.0 GHZ+ 64-bit CPU
• RAM requirements:
• For single server installations, a minimum of 8GB of RAM is required.
• For multi-server installations, contact Zimbra sales for recommendations.
• Temp file space for installs and upgrades*
• 10 GB free disk space for software and logs (SATA or SCSI for performance, and RAID/Mirroring for redundancy)
• Additional disk space for mail storage
*Temp files space: The zimbra-store requires 5GB for /opt/zimbra, plus additional space for mail storage. The other nodes require 100MB.
General Requirements
• Firewall Configuration should be set to “No firewall”.
• RAID-5 is not recommended for installations with more than 100 accounts.
Operating System Network Edition
The following operating systems are supported:
• Red Hat® Enterprise Linux® 7 (64-bit)
• CentOS Linux® 7 (64-bit)
• Red Hat Enterprise Linux 6 (64-bit), patch level 4 or later is required
• CentOS Linux 6 (64-bit), patch level 4 or later is required
• Ubuntu 14.04 LTS Server Edition (64-bit)
• Ubuntu 12.04.4 LTS Server Edition (64-bit) running the saucy (3.11) or later kernel is required. Note: If the original install was done with Ubuntu 12.04.2 or earlier, manual intervention is required to switch to the saucy (3.11) or later kernel series. See https:// wiki.ubuntu.com/Kernel/LTSEnablementStack for further information.
• SUSE Linux Enterprise Server (SLES) 11, SP3 (64-bit) is required.
Important! Zimbra Collaboration 8.6 is the last supported release of SLES 11.
Virtualization Network Edition
The following hypervisors are supported:
• VMware vSphere 4.x
• VMware vSphere 5.x
File Systems
The following file systems are supported:
• ext3 or ext4 file system for Linux deployments
• NFS for backup onlyZimbra Collaboration 8.6
Diğer gereksinimler için :
https://files.zimbra.com/website/docs/8.6/ZCS_System_Requirements_8.6.0.pdf
Zimbra Collaboration Open Source versiyonunun kurulumu :
Örnek Yapımızın bilgisi:
Domain     : supforce.com
Hostname   : mail
IP Address : 192.168.1.200
1-Network Ayaraları:
Öncelikle CentOs sistemimizin network ayarlarını yapmamız gerekmektedir.
Ethernet ayarlarımızı aşağıdaki gibi yapalım.
vi ile enp0s3 isimli ethernet kartımızın script dosyasını açıyoruz
vi /etc/sysconfig/network-scripts/ifcfg-enp0s3Etkernet kartımızın script dosyasındaki aşağıdaki alanları yapılandırıyoruz.
BOOTPROTO=none
NAME=LAN
ONBOOT=yes
IPADDR0=192.168.1.200
PREFIX0=24
GATEWAY0=192.168.1.1
DNS1=192.168.1.200
DNS2=192.168.1.1
Aşağıdaki komut ile Network servisimizi resetliyoruz ve otomatik olarak başlatıyoruz.
service network restart
chkconfig network on2-Selinux & Firewall devre dışı bırakma:
Öncelikle Selinux güvenlik yapısını devre dışı bırakıyoruz. Bunun için vi ile aşağıdaki config dosyasını açıyoruz.
vi /etc/sysconfig/selinuxBu dosyada SELINUX=enforcing parametresini SELINUX=disabled olarak değiştiriyoruz.
Daha sonrasında aşağıdaki komutları sırayla tek tek çalıştırarak bize sorun çıkarabilecek servisleri devre dışı bırakıyoruz.
setenforce 0
service firewalld stop
service iptables stop
service ip6tables stop
systemctl disable firewalld
systemctl disable iptables
systemctl disable ip6tables3-Host ayarlarında değişiklik:
Vi ile aşağıdaki yoldaki host dosyamızı açıyoruz.
vi /etc/hostsHosts dosyamızın içeriğini aşağıdaki gibi ayarlıyoruz.
127.0.0.1 localhost
192.168.26.11 mail.supforce.com mail
Daha sonra yine vi ile aşağıdaki dosyamızı açıyoruz.
vi /etc/resolv.confAçmış olduğumuz resolv.conf dosyasını aşağıdaki gibi düzenliyoruz.
search supforce.com
nameserver 192.168.1.200
nameserver 192.168.1.1
nameserver 8.8.8.8
Daha sonra root olarak aşağıdaki komutu çalıştırıyoruz.
hostname mail.supforce.com
echo "HOSTNAME=mail.supforce.com" >> /etc/sysconfig/network4-Sendmail veya Postfix Servislerini devre dışı bırakma:
Aşağıdaki komutları tek tek rootla çalıştırıyoruz.
service sendmail stop
service postfix stop
systemctl disable sendmail
systemctl disable postfix5-Zimbra kurulumu için gerekli paket kurulumu:
Zimbra kurulumu için gerekli paketleri ve repo güncellemesini aşağıdaki komut ile yapıyoruz.
yum update
yum -y install perl perl-core wget screen w3m elinks openssh-clients openssh-server bind bind-utils unzip nmap sed nc sysstat libaio rsync telnet aspell5-Local Dns server’ın yapılandırılması:
Zimbra’nın sağlıklı çalışabilmesi için zimbra makinesindeki local dns server ın yapılandırılması gerekmektedir. Bunun için aşağıdaki adımları takip ediyoruz.
Aşağıdaki komut ile named.conf dosyamızı açıyoruz.
vi /etc/named.confaşağıdaki gibi listen-on port 53 ve allow-query ye any kelimesini ekliyoruz.
listen-on port 53 { 127.0.0.1; any; };
allow-query { localhost; any; };
dosyanın alt taraflarına aşağıdaki şekilde yeni bir zone ekliyoruz.
zone "supforce.com" IN { type master; file "db.supforce.com"; allow-update { none; }; };Aşağıdaki komutları tek tek çalıştırarak /var/named/ folder ında yeni zone umuz için yeni bir database oluşturuluyor.
touch /var/named/db.supforce.com
chgrp named /var/named/db.supforce.com
vi /var/named/db.supforce.com
Hemen bir üst satırda vi ile açtığımız database imizin içeriğini aşağıdaki gibi düzenleiyoruz.
$TTL 1D
@       IN SOA  ns1.supforce.com. root.supforce.com. (
                                        0       ; serial
                                        1D      ; refresh
                                        1H      ; retry
                                        1W      ; expire
                                        3H )    ; minimum
@       IN      NS      ns1.supforce.com.
@       IN      MX      0 mail.supforce.com.
ns1     IN      A       192.168.1.200
mail    IN      A       192.168.1.200
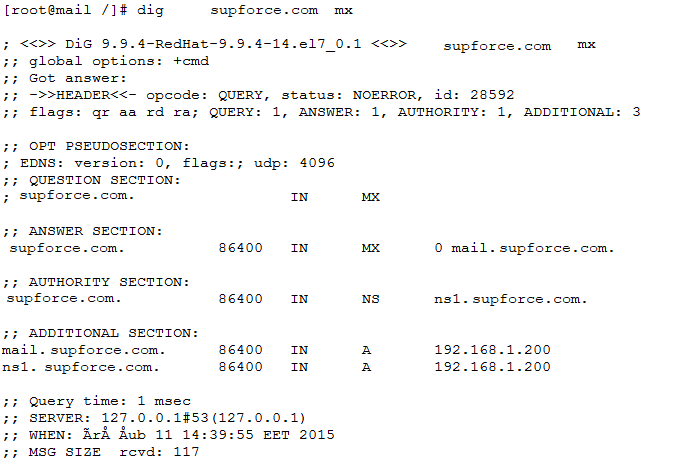
aşağıdaki komutlarla dns servisini restart ediyoruz ve yeni oluşturduğumuz dns yapımızı kontrol ediyoruz.
service named restart
systemctl enable named
nslookup mail.supforce.com
dig supforce.com mx
Aşağıdakine benzer bir sonuç aldıysanız işlemleriniz başarılıdır.
[root@mail /]# nslookup mail.supforce.com
Server:         127.0.0.1
Address:        127.0.0.1#53

Name:   mail.supforce.com
Address: 192.168.1.200
5-Zimbra kurulum dosyasının hazırlanması:
Zimbra kurulumu için gerekli ön hazırlıkları yaptıkdan sonra artık kuruluma geçebiliriz.
Öncelikle aşağıdaki link dende kurulum dosyasını indirebilirsiniz.
https://files.zimbra.com/downloads/8.6.0_GA/zcs-8.6.0_GA_1153.RHEL7_64.20141215151110.tgz
Aşağıdaki komut ile kurulum dosyamızı /opt/ klasörüne indiriyoruz.
cd /opt/wget -c https://files.zimbra.com/downloads/8.6.0_GA/zcs-8.6.0_GA_1153.RHEL7_64.20141215151110.tgz Download işlemi bittikden sonra indirmiş olduğumuz sıkıştırılmış kurulum paketi aşağıdaki komut ile bulunduğu folderda açıyoruz.
tar -zxvfv zcs-8.6.0_GA_1153.RHEL7_64.20141215151110.tgz cd zcs-8.6.0_GA_1153.RHEL7_64.20141215151110 5-Zimbra kurulumuna başlama:
Dosyaları açtığımız folder da aşağıdaki komutu yazarak kurulum işlemlerine başlıyoruz.
sh install.sh“Y” ile Lisans anlaşmasını kabul ediyoruz.
Do you agree with the terms of the software license agreement? [N] Y Kurulmasını istediğimiz paketleri “Y” ile seçiyoruz.
Install zimbra-ldap [Y] Y
Install zimbra-logger [Y] Y
Install zimbra-mta [Y] Y
Install zimbra-dnscache [Y] N
Install zimbra-snmp [Y] Y
Install zimbra-store [Y] Y
Install zimbra-apache [Y] Y
Install zimbra-spell [Y] Y
Install zimbra-memcached [Y] N
Install zimbra-proxy [Y] N
The system will be modified. Continue? sorusunu “Y” ile geçiyoruz.
Aşağıdaki şekilde gelen bir uyarıya YES diyerek domain name i değiştiriyoruz.
DNS ERROR resolving MX for mail.supforce.com
It is suggested that the domain name have an MX record configured in DNS
Change domain name? [Yes] Yes
Create domain: [mail.supforce.com] supforce.com
Eğer bir önceki aşamadaki domain name’i değiştirmezsek domain adımız mail.supforce.com şeklinde gözükecek buda mail adreslerinin @ işaretinden sonraki kısmına yansır.
bir sonraki aşamada aşağıdaki şekilde bir ekranla karşılaşırız. Bu rada önce 6 yı tıklatarak sonrada 4 ü tıklatarak admin şifremizi belirliyoruz.
1) Common Configuration:
2) zimbra-ldap:                             Enabled
3) zimbra-logger:                           Enabled
4) zimbra-mta:                              Enabled
5) zimbra-snmp:                             Enabled
6) zimbra-store:                            Enabled
        +Create Admin User:                    yes
        +Admin user to create:                 admin@supforce.com
******* +Admin Password                        UNSET
        +Anti-virus quarantine user:           virus-quarantine.dgnsq8ewc@supforce.com
......
......
Address unconfigured (**) items  (? - help) 6
Store configuration

   1) Status:                                  Enabled
   2) Create Admin User:                       yes
   3) Admin user to create:                    admin@supforce.com
** 4) Admin Password                           UNSET
   5) Anti-virus quarantine user:              virus-quarantine.dgnsq8ewc@supforce.com
......
......
Select, or 'r' for previous menu [r] 4

Password for admin@supforce.com (min 6 characters): [4f9yM57Zab] Rtv74sN73b
Parola belirleme işleme sonrasında “Select, or ‘r’ for previous menu [r]” sorusuna “r” ile cevap verip bir önceki menüye geri dönüyoruz.Daha sonra sorulan sorulara aşağıdaki şekilde cevaplar vererek kurulumun sonlarına yaklaşıyoruz.
*** CONFIGURATION COMPLETE - press 'a' to apply
Select from menu, or press 'a' to apply config (? - help) a
Save configuration data to a file? [Yes] Yes
Save config in file: [/opt/zimbra/config.24648]
Saving config in /opt/zimbra/config.24648...done.
The system will be modified - continue? [No] Yes
Operations logged to /tmp/zmsetup10052014-214606.log
“Notify Zimbra of your installation? and if has been appear Configuration complete – press return to exit sorusuna” “Yes” diyerek cevam veriyoruz.
Bu işlemlemden sonra kurulum tamamlanmıştır. Aşağıdaki komutu yazarak zimbranın tüm servislerinin çalışıp çalışmadığını kontrol edebilirsiniz.
su – zimbra -c “zmcontrol status” kullanıcılar için webmail den maillerine bakma link’i : https://ZimbraServer

yöneticiler için mail server ı yönetme link’i : https://ZimbraServer:7071